블록체인 틀 짜기
이번 글에선 블록체인의 틀을 작성해보겠습니다.
이번 글은 commit: cc52d2aa545ce20d78a49efaf338991844512a6e 까지의 코드를 바탕으로 작성했습니다. 코드를 보실때 참고해주시기 바랍니다.
yonsei blocks의 코드는 Daniel van Flymen의 글과 코드를 참조해 작성했습니다. 원본도 확인해주시기 바랍니다.
아웃라인
블록체인의 핵심 기술을 구현하되, 코드의 복잡도는 최대한 낮추도록 하겠습니다. 부족한 부분은 추후 수정해가도록 하겠습니다.
우선 저희가 오늘 구현할 내용을 아웃라인하겠습니다:
blocktransactions값 여러개를 기록하는block을 생성합니다- 각
block은 이전의block의prev_hash값을 기록해 불역성을 보장합니다 - 각
block은proof를 기록해 채굴자가 processing power를 투자했음을 보장합니다
transactionnode간의 거래를 가능케합니다sender,receiver,amount등의 정보를 기록합니다
- 네트워크
yonseiblocks에 참여하기 위해node로 등록하는 기능을 구현합니다yonseiblocks네트워크에서node를 register/deregister하는 기능을 구현합니다yonseiblocks네트워크의 다른node의 블록체인을 받아와 longest-chain 방식으로 consensus를 받습니다
사용 언어 및 툴
yonseiblocks는 Python3로 작성했습니다. HTTP 통신을 위해 requests를 사용하며 node를 실행할 웹서버를 위해 Flask를 사용합니다. yonseiblocks node와 통신을 위해 Postman 등을 설치하는 것도 권장합니다.
코어
아직은 코드가 간단하기 때문에 하나의 파일에 모든 로직이 담겨있습니다. 코드는 여기를 참고해주세요.
Blockchain 클래스 정의
Blockchain 클래스에는 블록체인 자체인 self.chain이 필요하며 아직 블록체인에 포함되지 않은 transaction을 담고 있을 utxo도 필요합니다. 또한 블록체인 참여하고 있는 node를 기록하고 있어야 합니다. 프로그램을 처음 실행하면 블록체인의 첫 블록인 genesis block도 생성해야 합니다.
class Blockchain(object):
    def __init__(self):
        self.chain = []
        self.utxo = []
        self.nodes = set()

        # Create the Genesis Block
        self.create_new_block(proof=1337, prev_hash=1337)
그럼 이제 create_new_block()을 구현해보겠습니다.
block 관련 함수 구현
    def create_new_block(self, proof, prev_hash):
        """
        Create a new Block in the Chain
        :param proof: <int> Proof found using the Proof of Work algorithm
        :param prev_hash: <str> hash of previous Block
        :return: <dict> new Block
        """

        # Create new block
        block = {
            'index': len(self.chain),
            'timestamp': time(),
            'transactions': self.utxo,
            'proof': proof,
            'prev_hash': prev_hash
        }

        # Remove recorded transactions from the UTXO
        self.utxo = []

        # Append new Block to the Chain
        self.chain.append(block)
        return block
block에는 블록체인에서 몇 번째인지 확인할 수 있는 index, 생성된 시간에 대한 timestamp, 블록에 포함되는 transactions를 포함하고 있습니다. 또한 채굴자가 processing power를 투자했다는 것을 증명하기 위해 proof of work를 수행할 것입니다. 그 작업의 결과물인 proof도 포함을 하며, 블록체인의 불역성을 위해 이전 block에 대한 해쉬값인 prev_hash를 포함합니다.
비트코인은 하나의 block당 포함할 수 있는 transactions 개수가 정해져 있으며 사기 방지를 위해 Merkle tree라는 자료구조 형태로 저장을 합니다. 저희는 우선 간단하게 구현해보겠습니다. 새로운 block이 생성되면 개수에 상관 없이 현 시점까지 모인 모든 transaction을 block에 list 형식으로 포함하겠습니다.
다음 block에 기록되는 transaction과, transaction에 대한 proof를 구하는 로직을 구현해보겠습니다.
transaction 관련 함수 구현
    def create_new_transaction(self, sender, receiver, amount):
        """
        Create a new Transaction to be added in the next Block
        :param sender: <str> uuid of sender
        :param receiver: <str> uuid of receiver
        :param amount: <int> amount of coins
        :return: <int> index of the Block that will hold this Transaction
        """

        self.utxo.append({
            'sender': sender,
            'receiver': receiver,
            'amount': amount,
        })

        return self.latest_block['index']+1
transaction은 보낸이, 받는이, 그리고 금액을 인자로 받습니다. 해당 정보를 json형태로 구축해 utxo에 추가합니다.
다음 transaction에 대한 proof를 구하는 로직을 구현해보겠습니다.
Proof of Work 구현
    def get_proof(self, prev_proof):
        """
        Perform the Proof of Work algorithm
            - Find a number p' such that hash(pp') contains 4 leading zeroes
            - p is the previous Proof, p' is the current Proof
        :param prev_proof: <int>
        :return: <int>
        """

        proof = 0
        while self.is_valid_proof(prev_proof, proof) is False:
            proof += 1

        return proof

    @staticmethod
    def is_valid_proof(prev_proof, proof):
        """
        Validate the proof
        :param prev_proof: <int> previous Proof
        :param proof: <current Proof
        :return: <bool>
        """

        guess = f'{prev_proof}{proof}'.encode()
        guess_hash = hashlib.sha256(guess).hexdigest()
        return guess_hash[:4] == "0000"
Proof of Work는 특정한 hash값이 나오는 문자열을 찾는 작업입니다. 단순히 아무런 한 hash값은 계산하는 것은 아닙니다. 문자열에 대한 아무런 제한조건이 없다면 rainbow table등을 활용해 공격이 가능하고, 블록에 포함되는 transactions에 대한 proof of work를 하지 않아도 되기 때문입니다. 즉, 저희가 찾고 싶은 문자열은, 블록체인의 가장 끝자리에 있는 block의 proof로 시작하는 문자열에서 파생되는 문자열이면서 동시에 hash값의 첫 4글자가 “0000”인 문자열을 찾도록 하겠습니다.
저희가 구현한 proof of work는 난이도가 변경하지 않습니다. 반면에 비트코인의 proof of work는 최근 블록이 채굴된 시간에 따라 난이도가 자동적으로 변경됩니다. (여기서 난이도는 hash값에서 일치하는 문자열의 길이를 뜻합니다. “0000”이 일치할 확률이 “00”만큼 일치할 확률보다 낮으며 “000000”만큼 일치할 확률보단 높은 것을 뜻합니다.) 이 부분도 yonseiblocks의 완성도가 높아지기 위해 추후 구현되야 할 부분입니다.
이제 API를 작성하기 전에 마지막으로 node 관련 함수를 구현해보겠습니다.
node 관련 함수 구현
    def register_node(self, address):
        """
        Add a new Node to the list
        :param address: <str> address of Node (eg. 'http://192.168.0.1:5000')
        :return: None
        """

        parsed_url = urlparse(address)
        self.nodes.add(parsed_url.netloc)

    def resolve_conflicts(self):
        """
        Perform the Consensus algorithm
        If there is a conflict, replace current Chain with the longest Chain in the network
        :return: <bool> True if chain was replaced
        """

        new_chain = None
        max_length = len(self.chain)

        # Verify all the Chains in the network
        for node in self.nodes:
            response = requests.get(f'http://{node}/chain/get')

            if response.status_code == 200:
                cur_length = response.json()['length']
                cur_chain = response.json()['chain']

                # Check if length of Chain is longer and is valid
                if cur_length > max_length and self.is_valid_chain(cur_chain):
                    max_length = cur_length
                    new_chain = cur_chain

        if new_chain:
            self.chain = new_chain
            return True

        return False

    def is_valid_chain(self, chain):
        """
        Validate a chain
        :param chain: <list> a chain
        :return: <bool>
        """

        cur_index = 1

        while cur_index < len(chain):
            prev_block = chain[cur_index-1]
            cur_block = chain[cur_index]
            print(f'{prev_block}')
            print(f'{cur_block}')
            print("\n---------\n")

            # Check that the hash of the Block is correct
            if cur_block['prev_hash'] != self.calculate_hash(prev_block):
                return False

            # Check that the Proof is correct
            if not self.is_valid_proof(prev_block['proof'], cur_block['proof']):
                return False

            cur_index += 1

        return True
yonseiblocks에 참여하는 다른 node들과 통신하기 위해선 등록을 해야합니다. register_node()는 IP address와 port 번호로 등록을 합니다. resolve_conflicts()는 알고 있는 모든 node의 chain을 확인합니다. 각 node가 가지고 있는 chain 중 가장 길면서 유효한 chain을 찾아 본인의 chain을 업데이트합니다.
이제 블록체인의 기본적인 기능은 모두 완성되었습니다. 실제로 사용할 수 있게 Flask로 API를 작성해보겠습니다.
API 작성
Flask 서버를 구축하고 node에게 고유식별자를 부여합니다.
# Instantiate Node
app = Flask(__name__)

# Generate a uuid for this Node
node_identifier = str(uuid4()).replace('-', '')

# Instantiate Blockchain
blockchain = Blockchain()
채굴 API는 utxo에 쌓인 거래에 추가적으로 채굴 보상을 지급합니다.
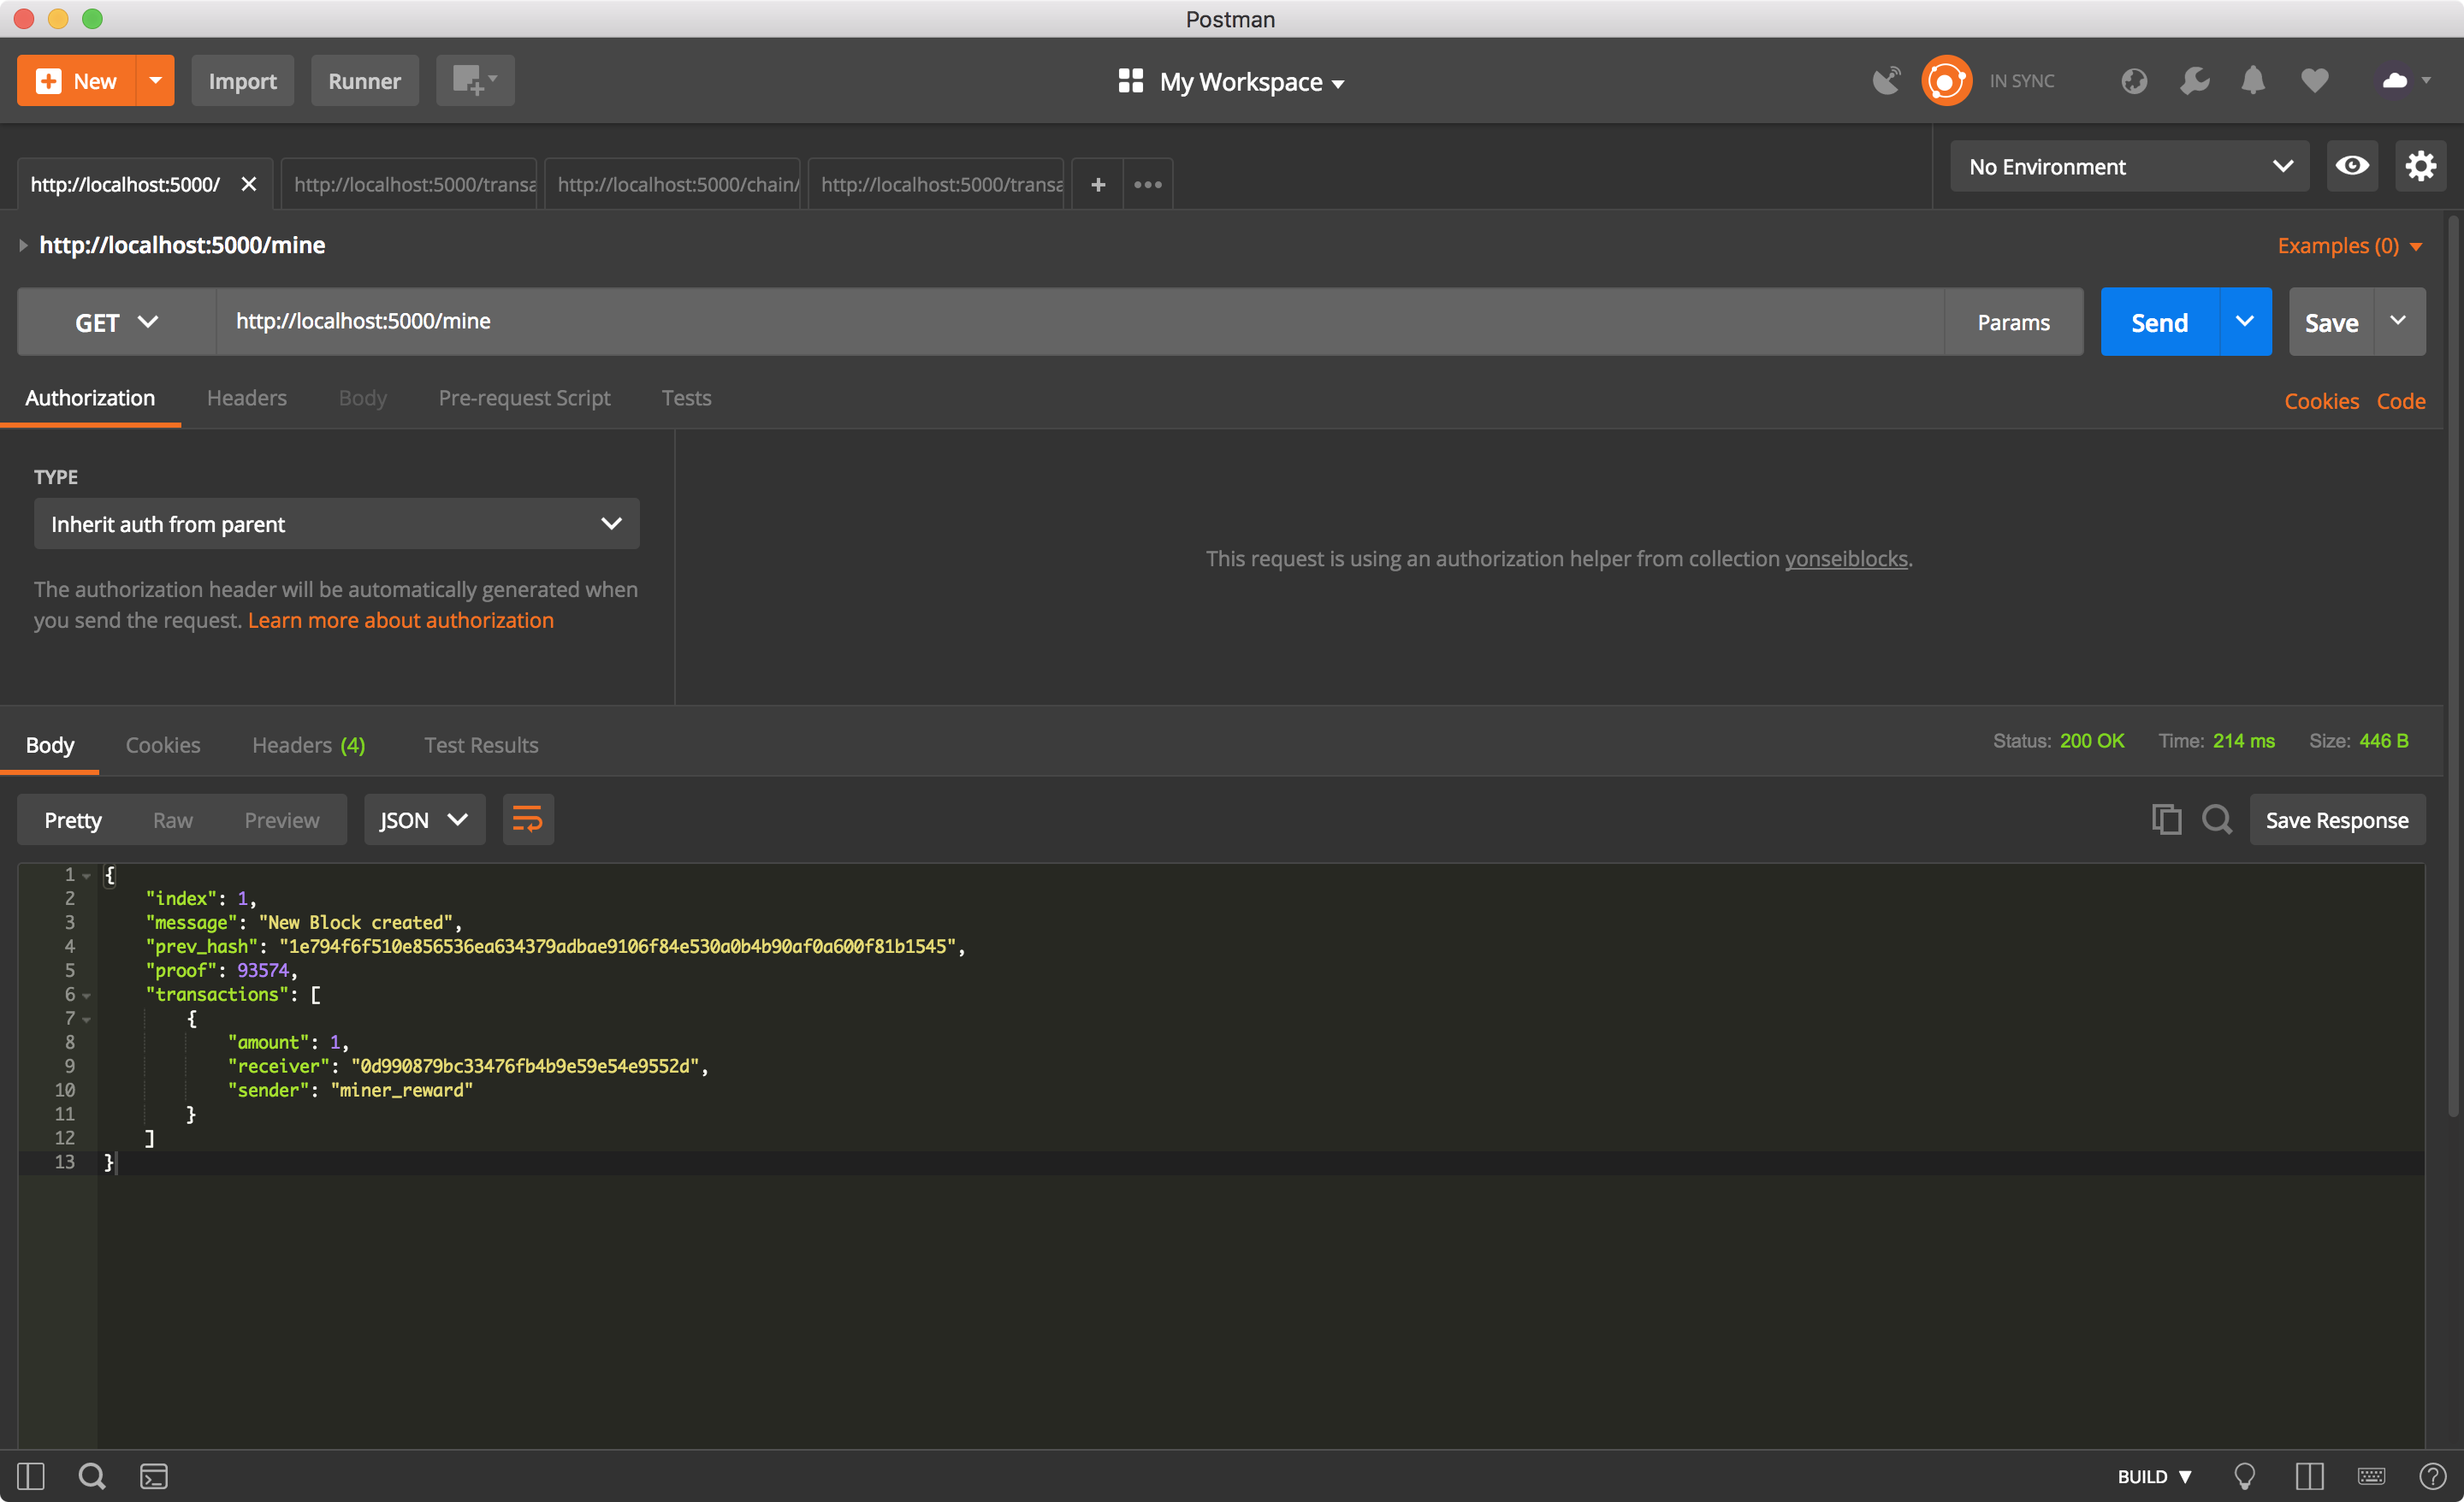
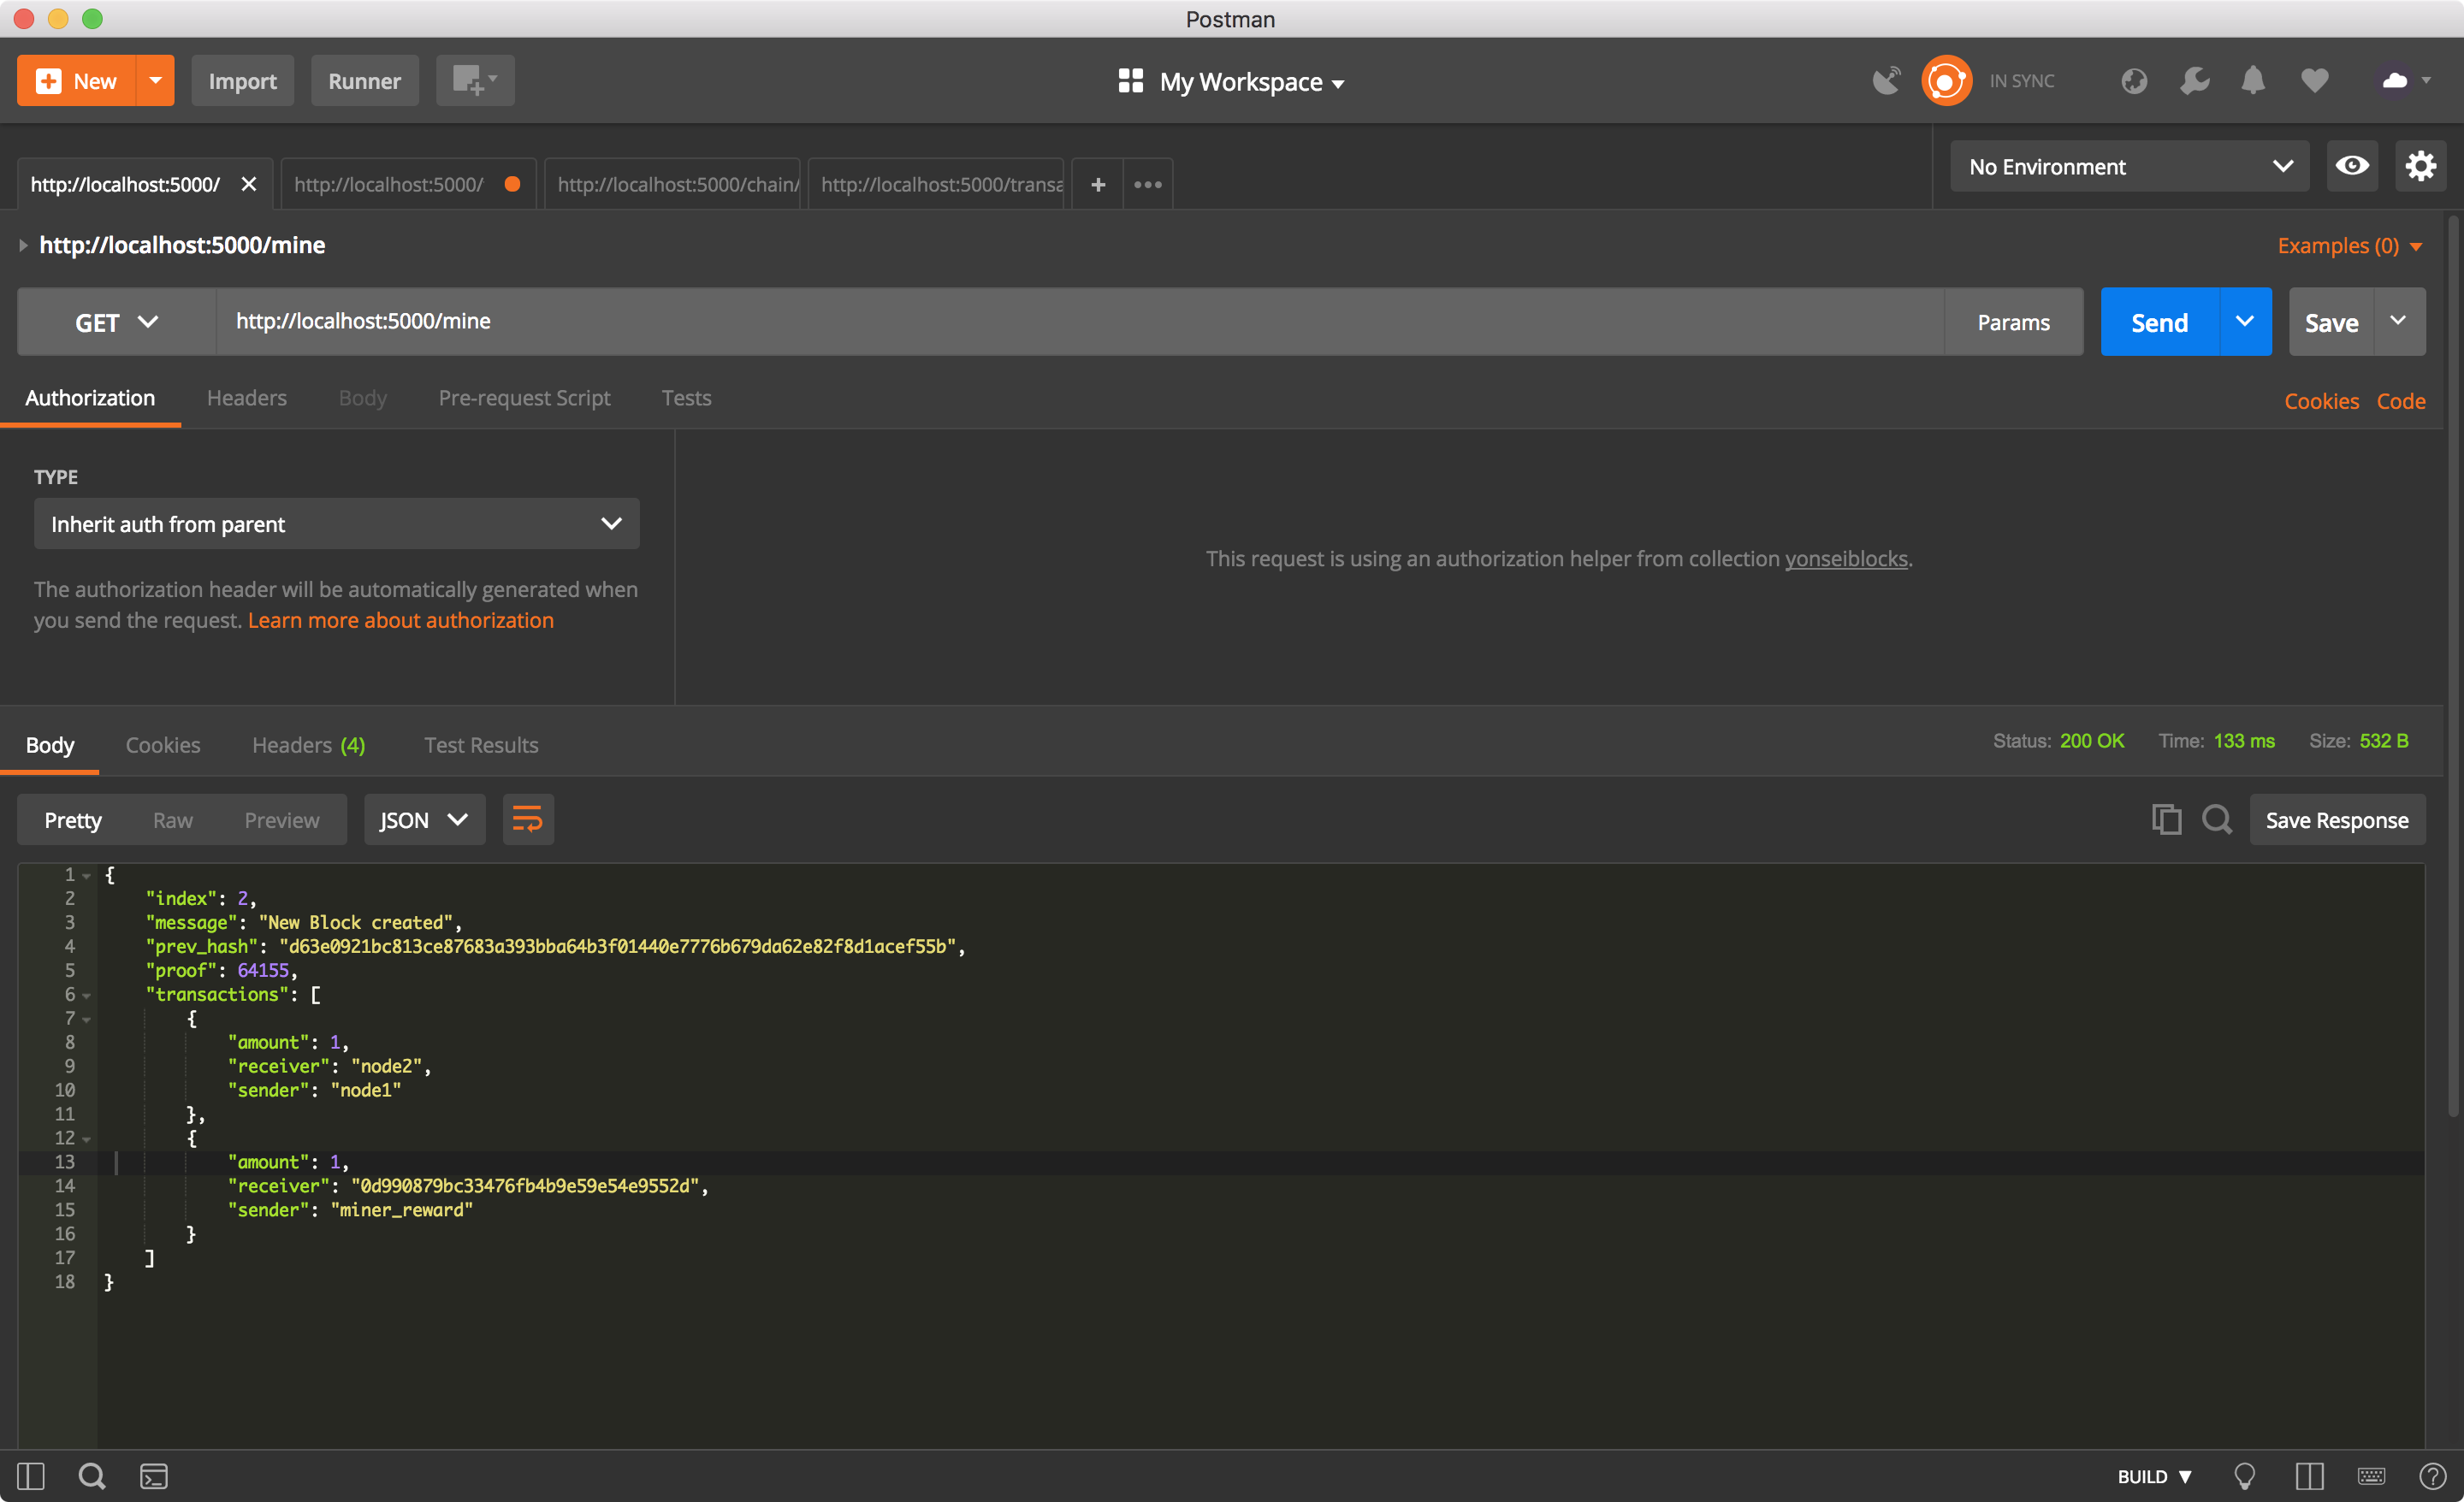
@app.route('/mine', methods=['GET'])
def mine():

    # Get Proof for next new Block
    latest_block = blockchain.latest_block
    latest_proof = latest_block['proof']
    proof = blockchain.get_proof(latest_proof)

    # Use dummy sender with id `miner_reward` for mined coin
    blockchain.create_new_transaction(
        sender="miner_reward",
        receiver=node_identifier,
        amount=1,
    )

    # Create new Block and add to Chain
    latest_hash = blockchain.calculate_hash(latest_block)
    new_block = blockchain.create_new_block(proof, latest_hash)

    response = {
        'message': "New Block created",
        'index': new_block['index'],
        'transactions': new_block['transactions'],
        'proof': new_block['proof'],
        'prev_hash': new_block['prev_hash'],
    }
    return jsonify(response), 200
거래 API는 인자에 대한 확일을 거쳐 transaction을 utxo에 추가합니다.
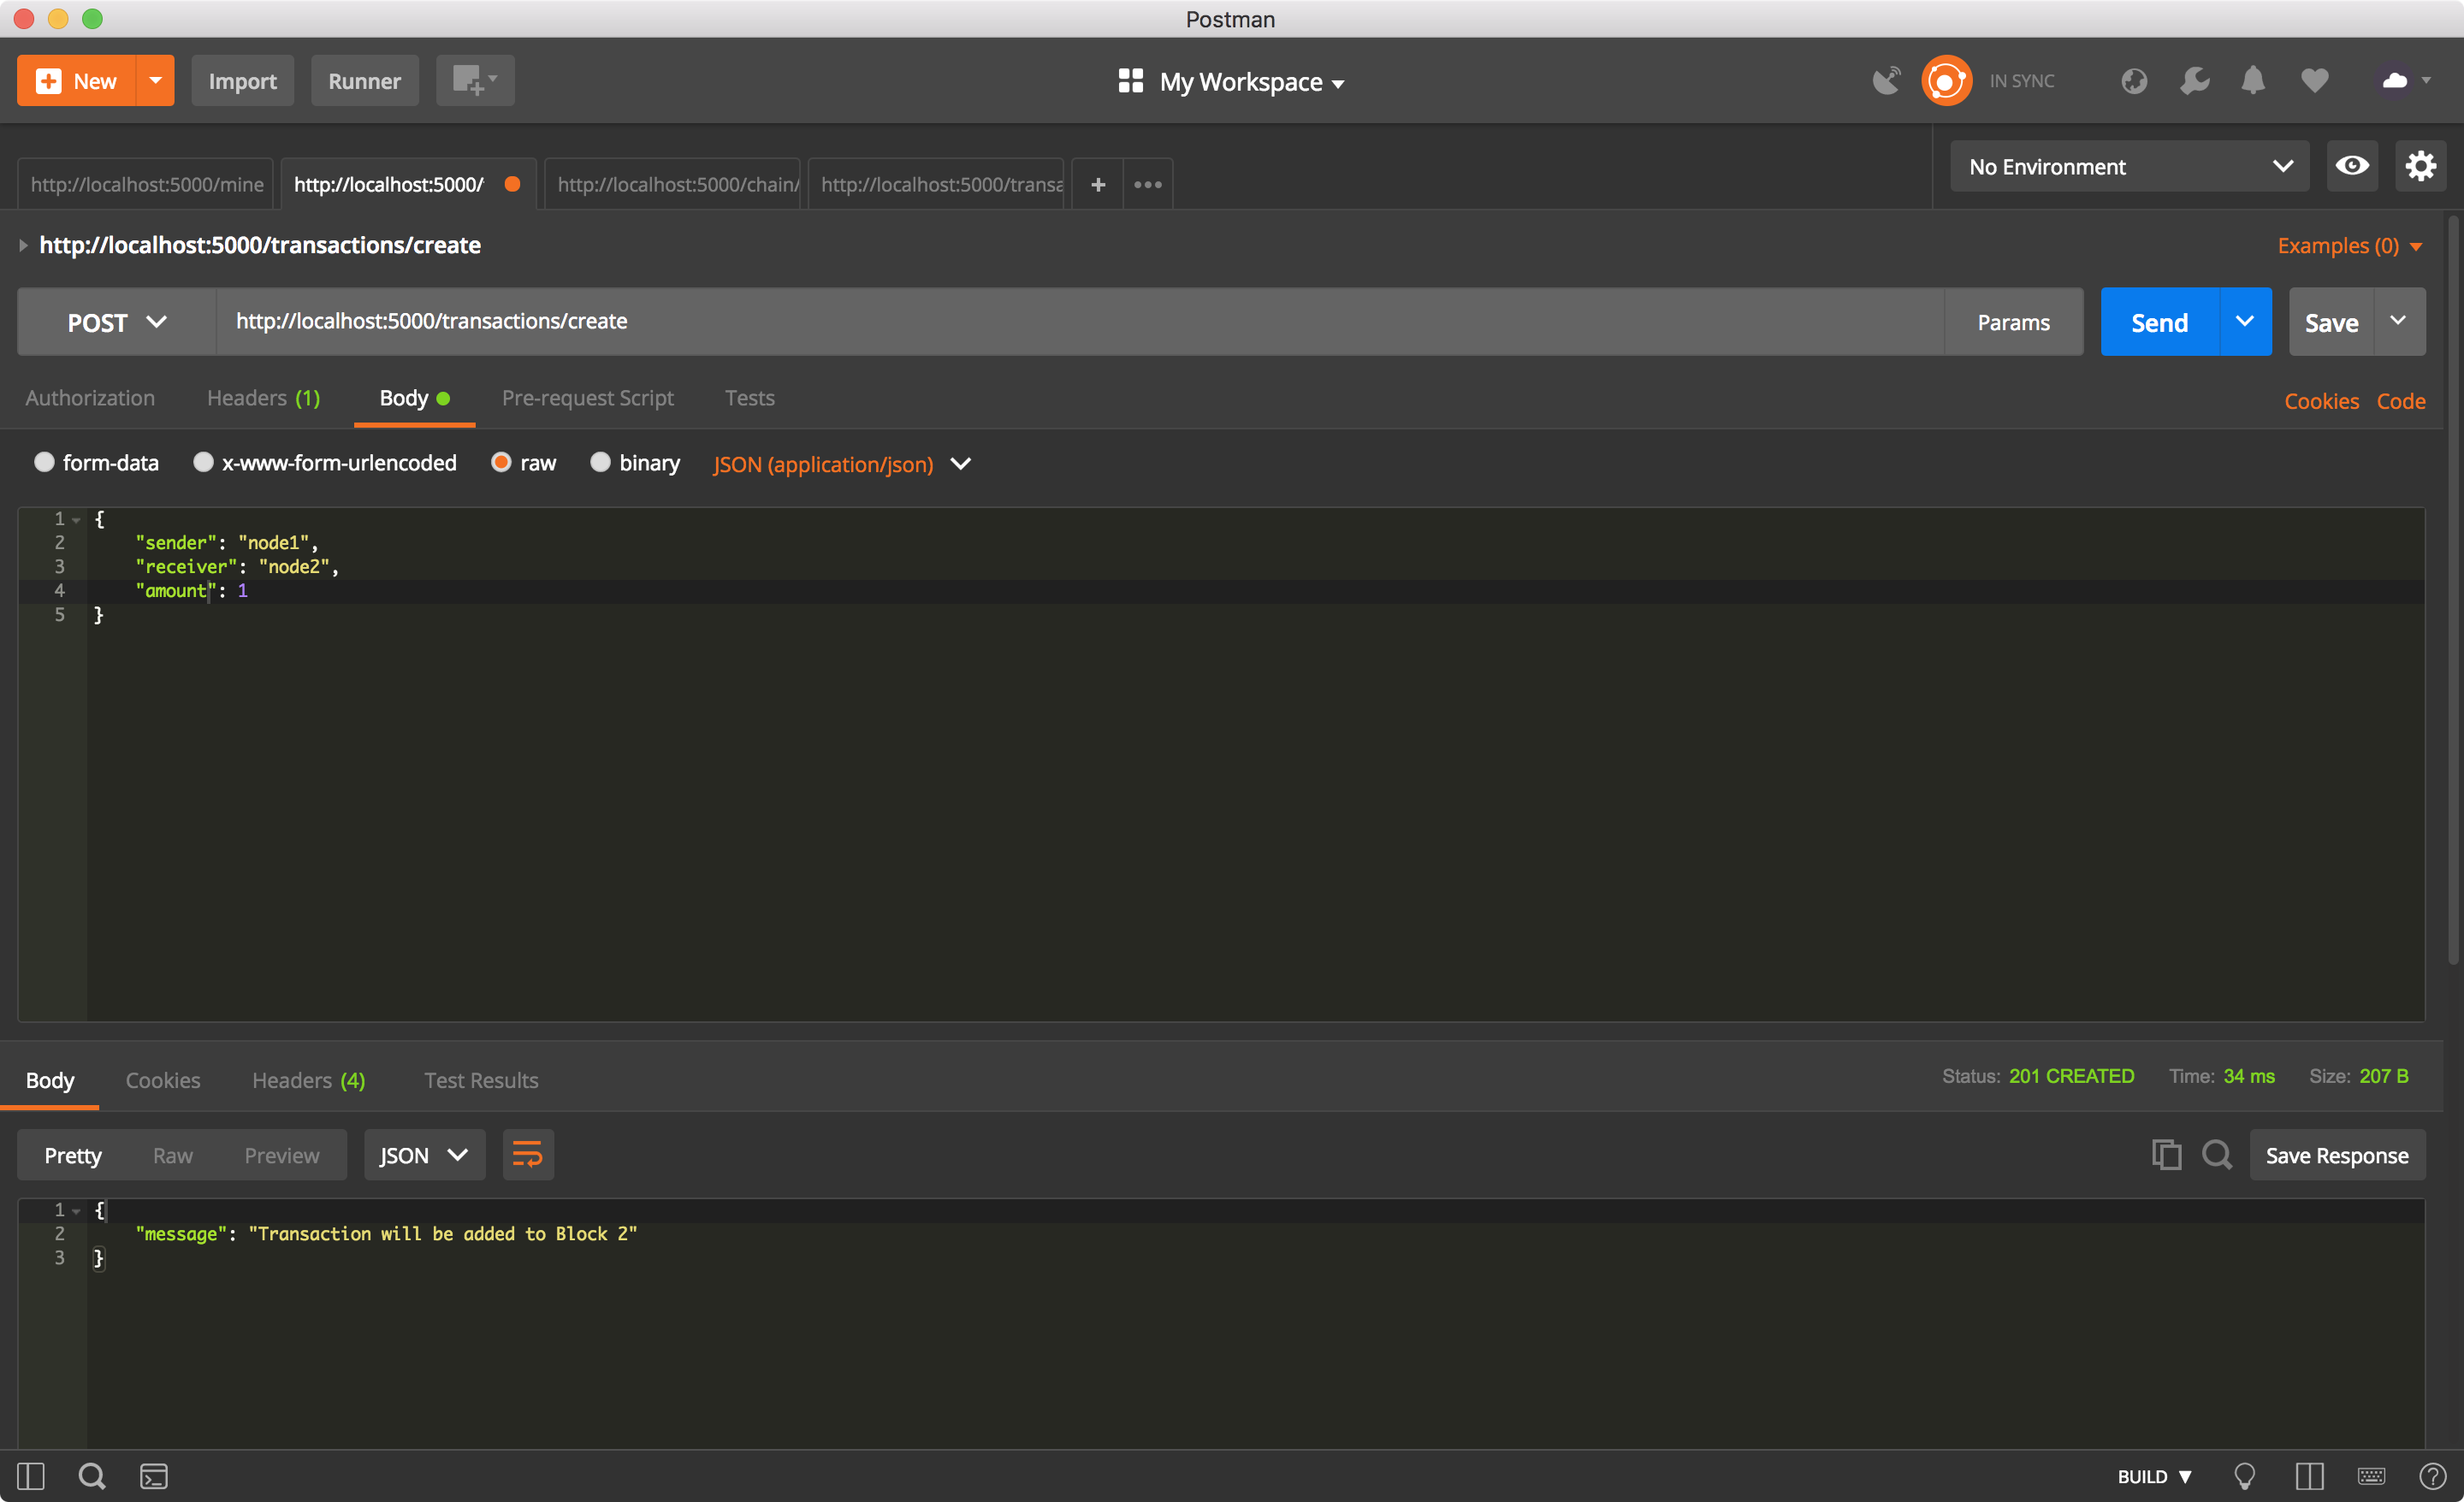
@app.route('/transactions/create', methods=['POST'])
def create_transaction():

    values = request.get_json()

    # Check that the required fields are in the POST data
    required = ['sender', 'receiver', 'amount']
    if not all(k in values for k in required):
        return 'Missing values', 400

    # Create a new Transaction
    index = blockchain.create_new_transaction(
        sender=values['sender'],
        receiver=values['receiver'],
        amount=values['amount'],
    )

    response = {'message': f'Transaction will be added to Block {index}'}
    return jsonify(response), 201
블록체인의 정보를 json형태로 리턴합니다.
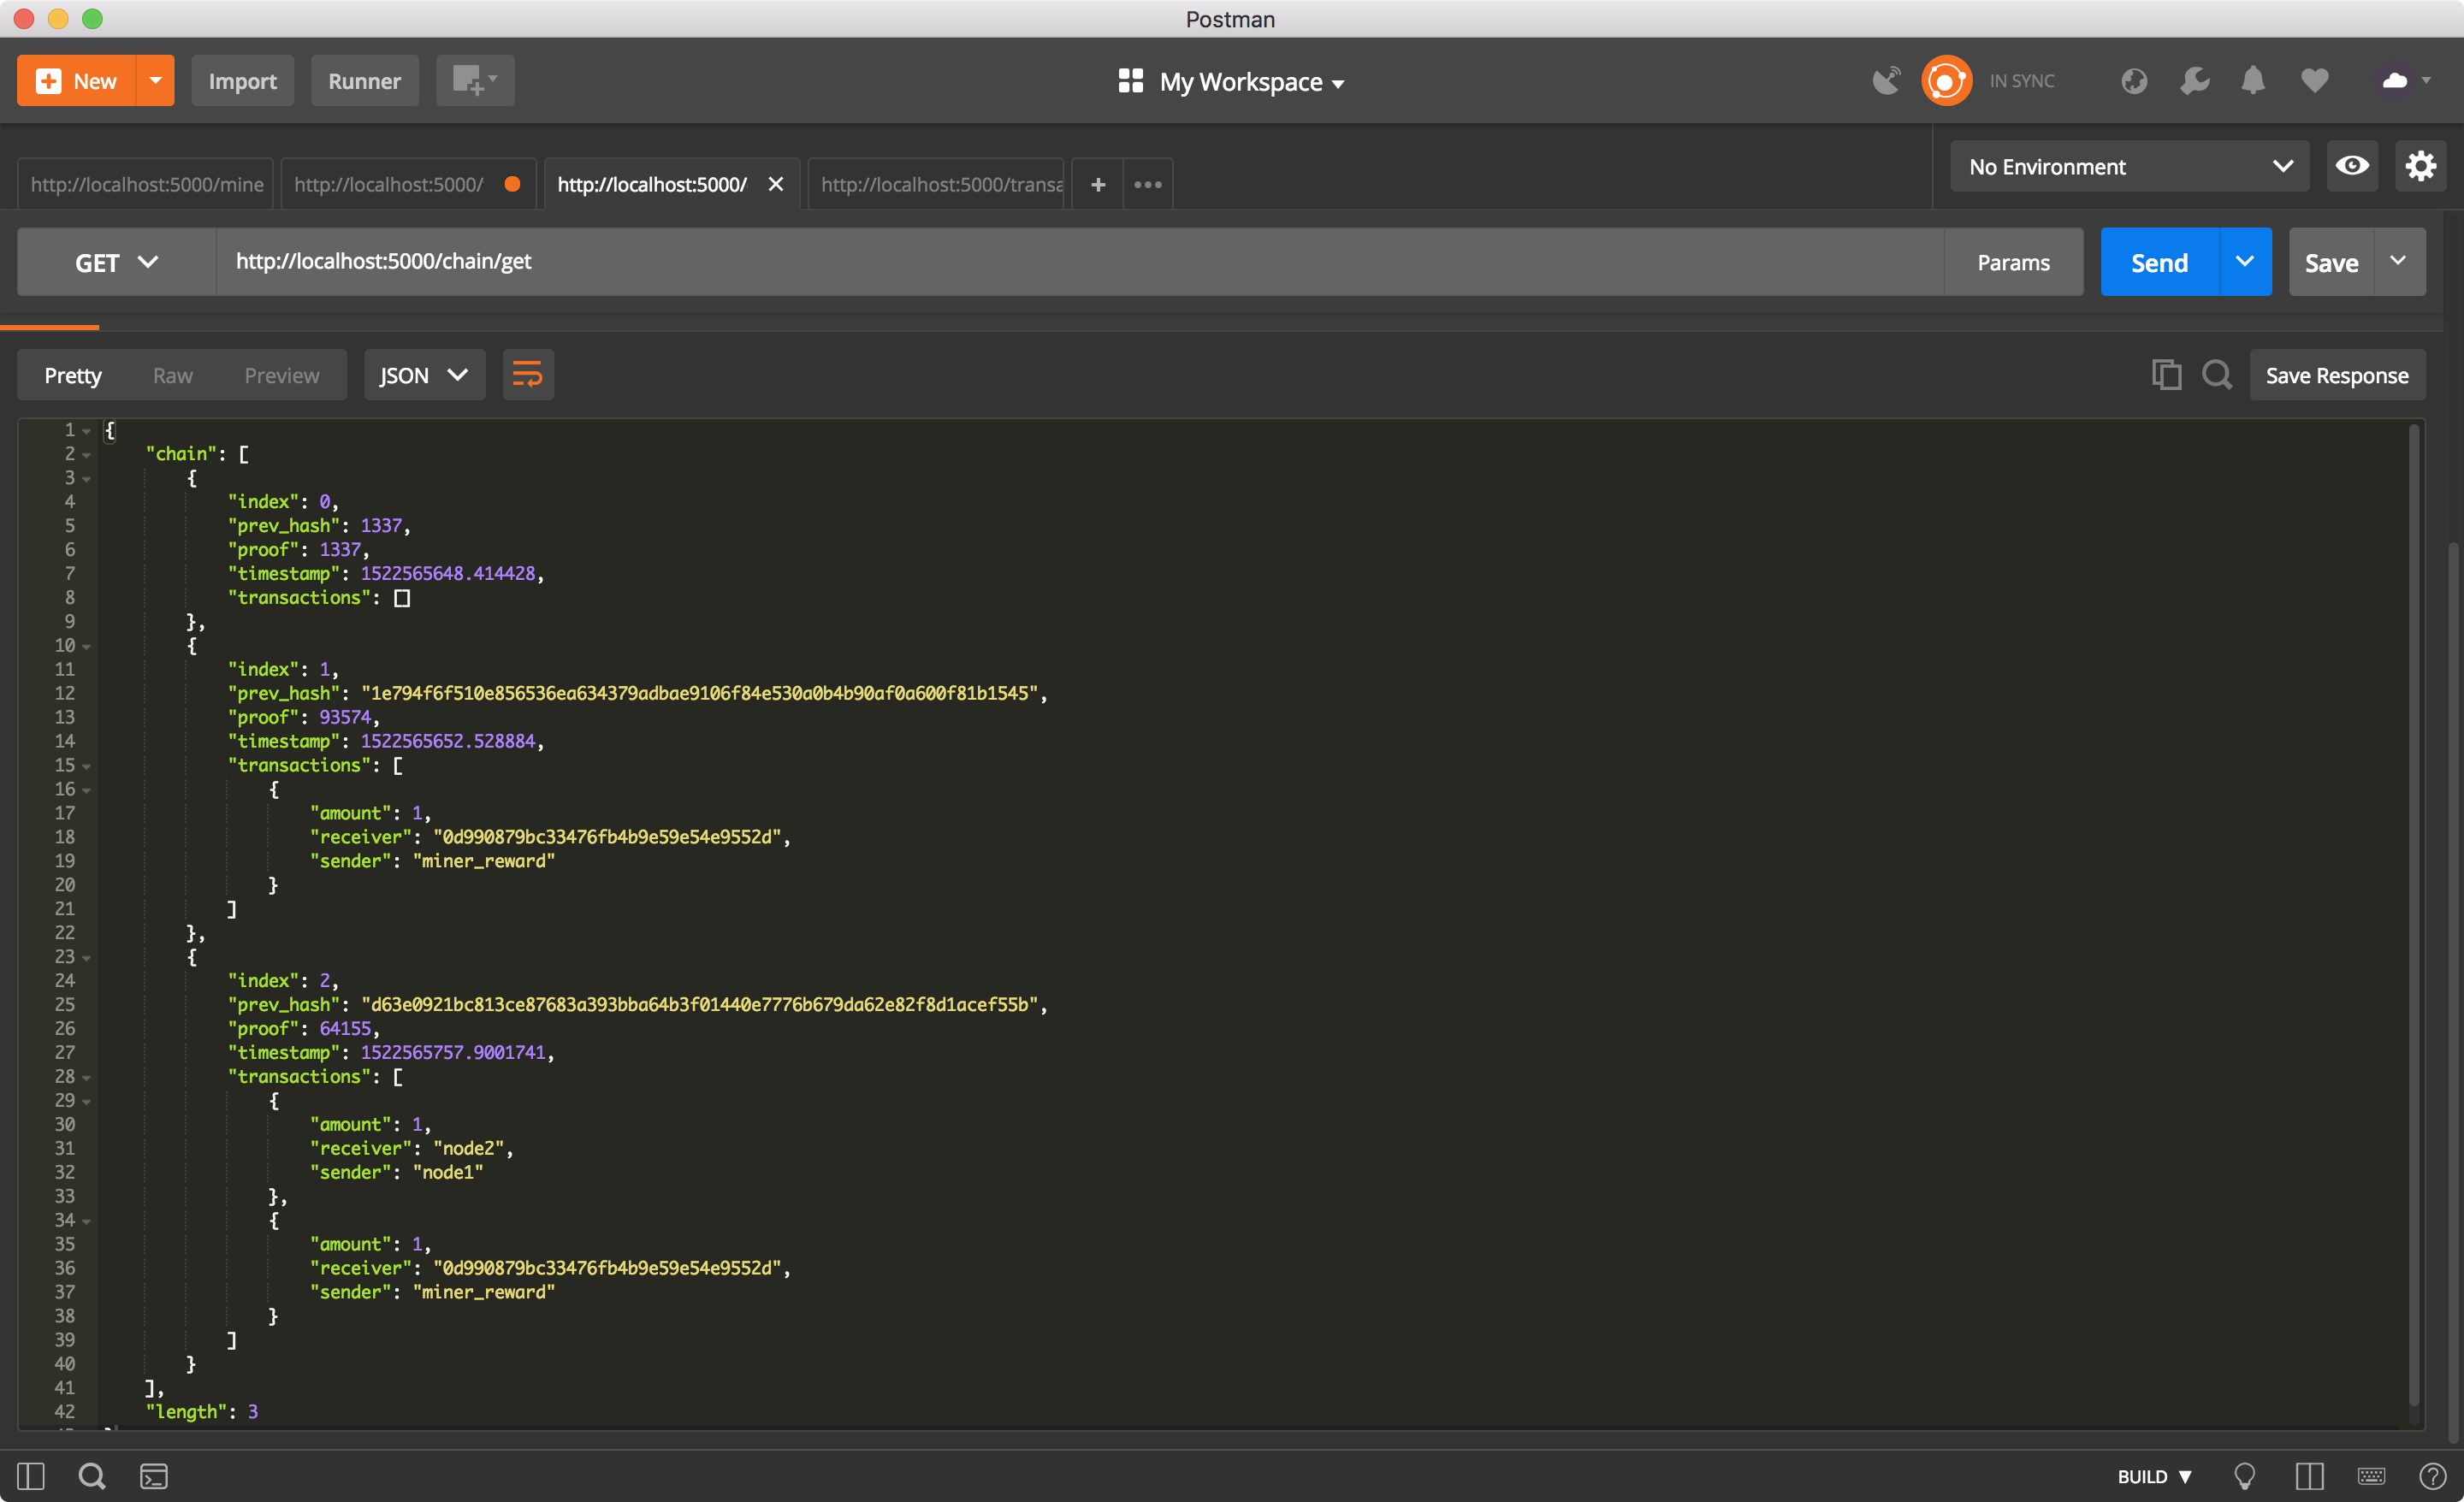
@app.route('/chain/get', methods=['GET'])
def get_chain():

    response = {
        'length': len(blockchain.chain),
        'chain': blockchain.chain,
    }
    return jsonify(response), 200
node를 등록하고 블록체인을 업데이트하는 API를 작성합니다.
@app.route('/nodes/register', methods=['POST'])
def register_nodes():

    values = request.get_json()

    nodes = values.get('nodes')
    if nodes is None:
        return "Error: Please provide a valid list of nodes", 400

    for node in nodes:
        blockchain.register_node(node)

    response = {
        'message': "New Nodes have been added",
        'total_nodes': list(blockchain.nodes),
    }
    return jsonify(response), 201


@app.route('/nodes/resolve', methods=['GET'])
def resolve_conflicts():
    replaced = blockchain.resolve_conflicts()

    if replaced:
        response = {
            'message': "This node\'s chain has been replaced",
            'new_chain': blockchain.chain,
        }
    else:
        response = {
            'message': "This node\'s chain is authoritative",
            'chain': blockchain.chain,
        }

    return jsonify(response), 200
마지막으로 웹서버를 실행하는 메인함수를 작성합니다.
if __name__ == '__main__':

    parser = ArgumentParser()
    parser.add_argument('-p', '--port', default=5000, type=int, help='port number for web app')
    args = parser.parse_args()
    port = args.port

    app.run(host='0.0.0.0', port=port)
실행
첫 block을 채굴하기.
거래하기.
utxo에 transaction이 있을 때 채굴하기.
현재 chain 상태 확인하기.
마무리
이번엔 블록체인 기술의 가장 핵심적인 기술을 최대한 간단하게 구현해봤습니다. 앞으로 yonseiblocks의 코드를 더 고도화 시키면서 함께 블록체인 기술에 대해서 배워보도록 하겠습니다. 읽어주셔서 감사합니다!